With so many different Fabric items to work with that allow you to move and transform data, it becomes essential to have a way to “arrange” all that movement of data. Enter Apache Airflow, now available as it’s own integrated item in Fabric.

An Airflow job will allow you to define the different steps your entire load process for your warehouse needs to go through and in which order. You model these steps in a Directed Acyclis Graph (DAG). I came across this nice explanation of this concept – https://www.astronomer.io/docs/learn/dags/
At the end of the day, you’ll have a robust definition of the steps, but also the ability to follow in real-time the status of the different nodes, compare metrics with previous runs, have log files with the nitty-gritty detail and even link back into the Fabric item.
This item is still in preview, but it has all the hallmarks of becomng an essential tool to complete Fabric from an orchestration point of view. You could claim that pipelines can do the same, but you’ll quickly lose the overview of pipelines calling pipelines in a more complex environment.
I wanted to provide all the steps to run your first DAG in Fabric, documenting the different challenges and technical specifics I had to overcome.
Permissions
A few settings need to be taken into account to make sure all of the next steps can be executed.
Fabric Tenant Admin
In the Fabric admin tenant settings, you’ll have to enable the Airflow preview for now. This is disabled by default.

Also, make sure that you have enabled the access for service principals. If not, you cannot assign membership to the workspace to a Service Principal.

Authentication
This for sure is again the most finnicky and tedious part to get right. Given that Airflow is not build as a fully integrated part of Fabric, it inherently has to deal with its own connections and security.
EntraID Admin Center
In Entra admin center, go to Conset and permissions : Consent and permissions – Microsoft Entra admin center

Select “Allow user consent for apps”. I was also able to use the second option for the DAG with Fabric items I was executing, but this is how it’s specified in the Microsoft documentation.
Service Principal
In the Azure portal, in EntraID, you’ll need to create an App Registration. You can follow the instructions in the Microsoft documentation.
The important steps are:
- Name : anything, e.g. AirFlow. Note down the Client ID (application ID) from the overview page.
- In Authentication, add a Platform, web link, with the Redirect URI set to https://login.microsoftonline.com/common/oauth2/nativeclient
- In Certificates & secrets, add a secret and store it safely
- In API Permissions, add following permissions from Power BI Service and Microsoft Graph
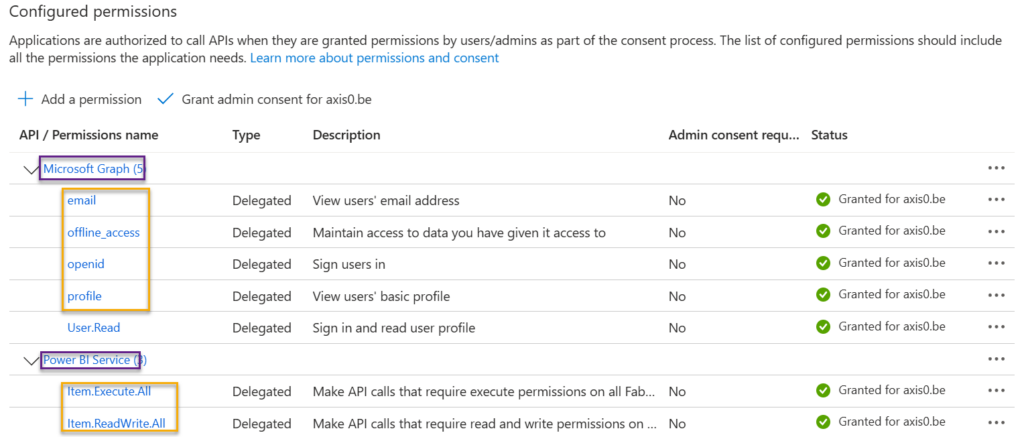
(add an Owner to the service principal, just so you can delegate the maintenance, not essential for this setup)
Refresh Token
Finally, we’ll be able to get a refresh token using the OAuth2 auth code flow protocol which will be the final piece of the puzzle to use a Fabric Airflow DAG connection.
Get Code
I tend to use Postman for this, due to its advanced configuration options.
A first call will allow us to get a code, with which in the second request we can retrieve a refresh token.
Prepare a GET request to this URL : https://login.microsoftonline.com/{tenant-id}/oauth2/v2.0/authorize where you replace tenant id with the value of your Fabric tenant, which you can find in the Fabric portal, ? menu, About PowerBI. There will be a line with Tenant URL, which contains the tenant id in the ctid parameter.
Provide the following parameters:
- client_id : from the service principal defined earlier
- response_type : code
- redirect_uri : https://login.microsoftonline.com/common/oauth2/nativeclient
- response_mode : query
- state : 12345 (this is just meant as a check in the protocol, the same field is returned with the same value)
- scope : https://api.fabric.microsoft.com/Item.Execute.All https://api.fabric.microsoft.com/Item.ReadWrite.All offline_access openid profile
- client_secret : the secret created in the service principal defined earlier
You’ll get a URL that looks like this:
https://login.microsoftonline.com/xxxxxxxxxxxxxxx/oauth2/v2.0/authorize?client_id=xxxxxxxxxxxxxxxxxx&response_type=code&redirect_uri=https://login.microsoftonline.com/common/oauth2/nativeclient&response_mode=query&state=12345&scope=https://api.fabric.microsoft.com/Item.Execute.All https://api.fabric.microsoft.com/Item.ReadWrite.All offline_access openid profile&client_secret=xxxxxxxxxxxxxx
Paste this in your browser and authenticate with your account. The browser URL will now be replaced with a new URL:
https://login.microsoftonline.com/common/oauth2/nativeclient?code=1.AQwA60ocEiofyyyyyyyyyyyyyyyyyyyyyyyyyyyyyyyyy-yyyyyyyyyyyyy0QBqn3mg&state=12345&session_state=aefe425d-yyyyyyyyyyyyy-88143d8d206e
The field of interest is the code field. Save this value.
Note that you only have to do this once, going forward, the refresh token will be reused for any connection made in Airflow.
Get Refresh Token
Using Postman, you can now create a second request. This time it’s a POST request to the URL https://login.microsoftonline.com/{tenant-id}/oauth2/v2.0/token
Provide the following data in the body (form-data works well in Postman):
- client_id : same as above
- client_secret : same as above
- grant_type : authorization_code
- code : the code returned above
- redirect_uri : https://login.microsoftonline.com/common/oauth2/nativeclient
- scope : https://api.fabric.microsoft.com/Item.Execute.All https://api.fabric.microsoft.com/Item.ReadWrite.All offline_access openid profile
Send the request and you’ll normally get a status 200 back with in the Body the “refresh_token”, amongst others.
Airflow setup
Finally, we can create a new Airflow item in Fabric. You’ll find yourself in an empty editor.
Create Connection for Fabric
On the top you’ll find “View Apache Airflow Connectors”. Click on it to create a new connector.
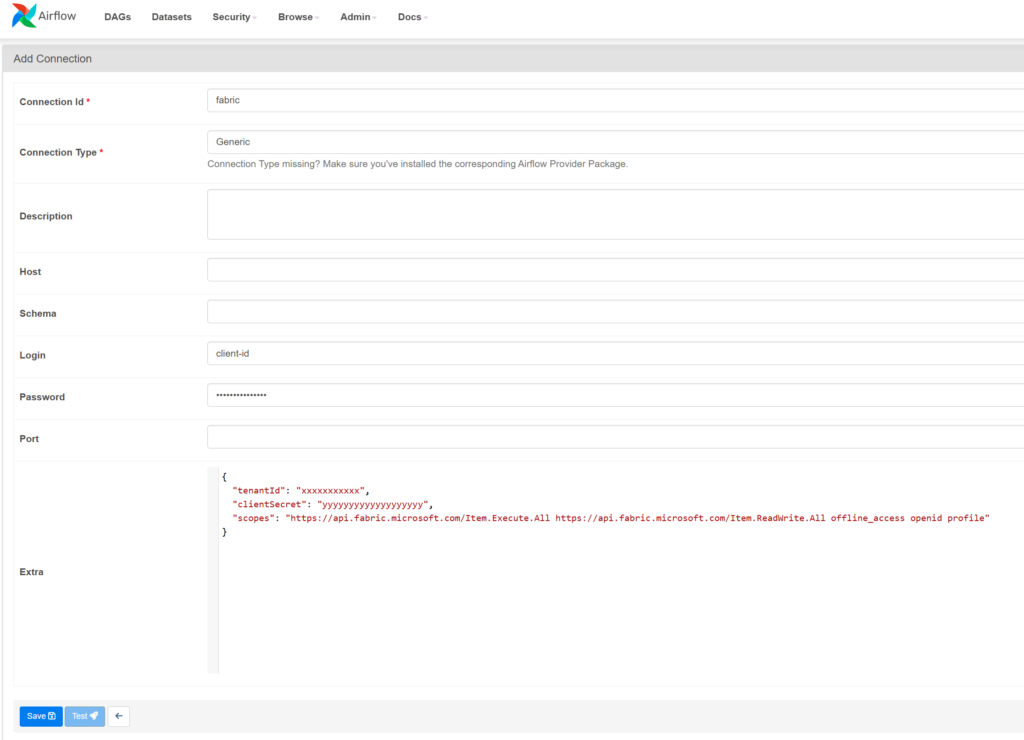
Make sure to fill in
- Connection ID : give it a meaningfull name, you’ll refer to it in code that uses this connection
- Connection Type : Generic
- Login : the client ID from before
- Password : the Refresh Token from before
- Extra : the following block :
{
“tenantId”: “xxxxxxxxxxx”,
“clientSecret”: “yyyyyyyyyyyyyyyyyyy”,
“scopes”: “https://api.fabric.microsoft.com/Item.Execute.All https://api.fabric.microsoft.com/Item.ReadWrite.All offline_access openid profile”
}
Don’t make the mistake to specify client_secret, that was mentioned incorrectly in various fora.
Create Connection for PowerBI
Unfortunately, a separate connection for a PowerBI task is needed as they differ ever so slightly.
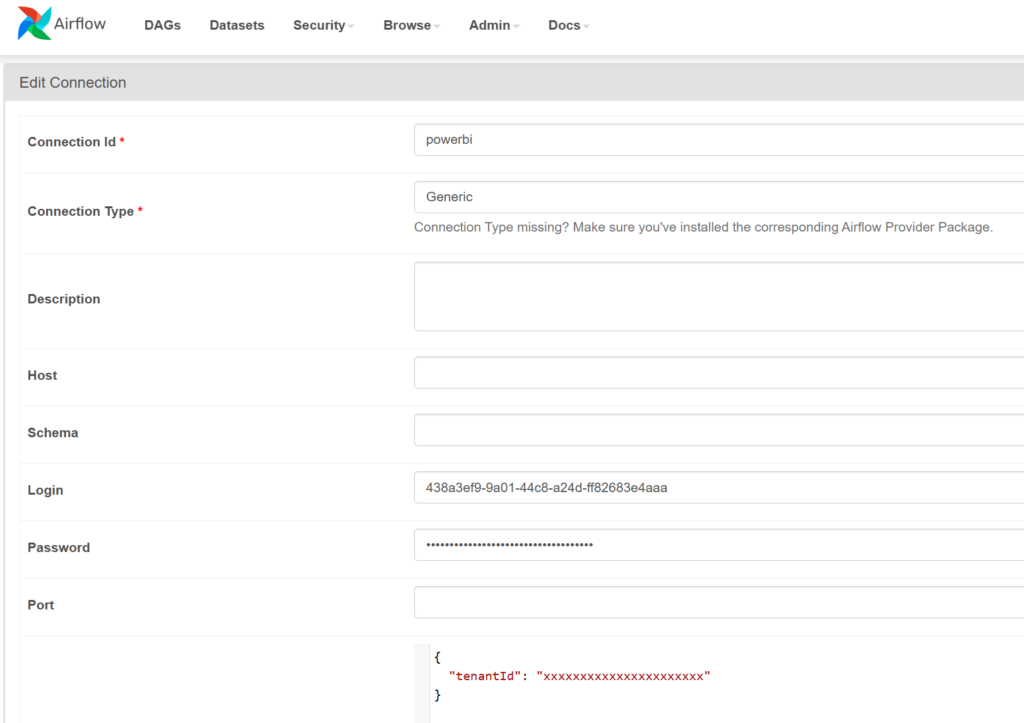
Make sure to fill in
- Connection ID : give it a meaningfull name, you’ll refer to it in code that uses this connection
- Connection Type : Generic
- Login : the client ID from before
- Password : the client secret
- Extra : the following block :
{
“tenantId”: “xxxxxxxxxxx”
}
Airflow settings
In Settings (the cog on the top left), make sure to include airflow-powerbi-plugin – this is only needed to run the PowerBI Refresh step.
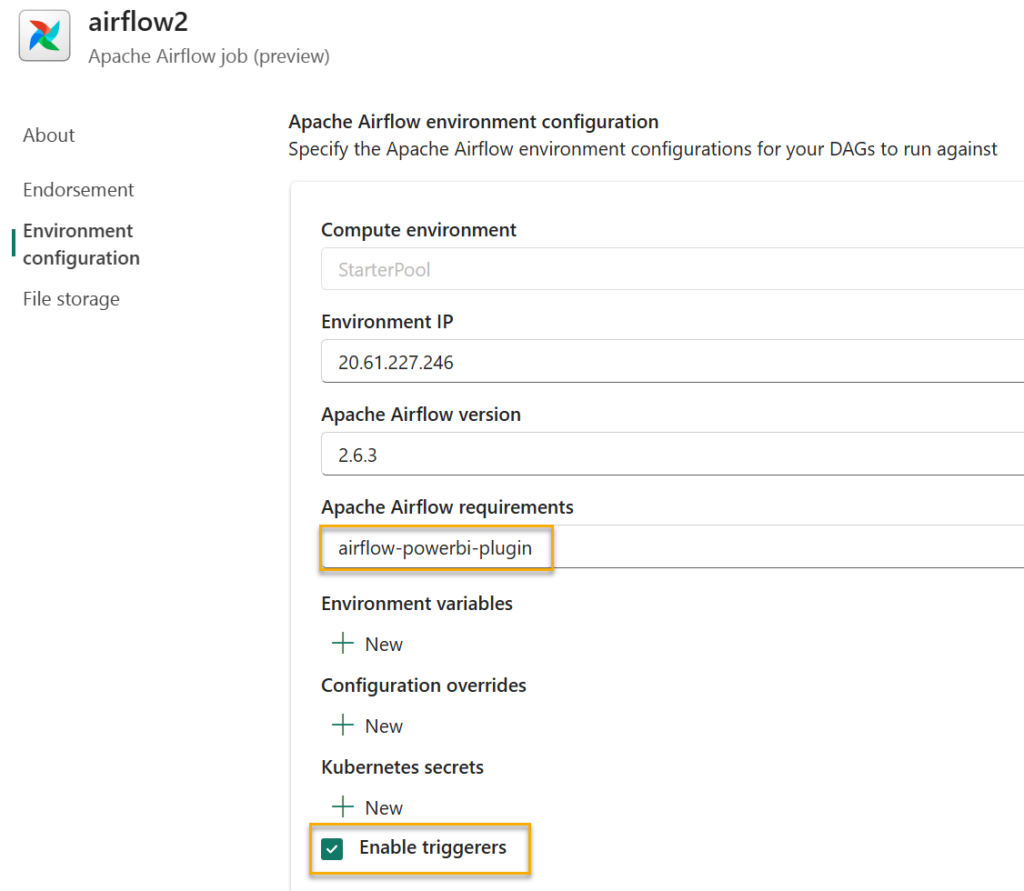
Also check the “Enable triggerers”, as this will allow you to include a plugin to link from your running DAG to the fabric item.
Create DAG to load the DW
When in the editor you can click “+ New” in the Explorer. Select dags folder and create sales_load_to_dw.py

This will create a boilerplate code for a first “Hello World” DAG. You can replace the code with the below, which is a DAG that calls 2 Pipelines, then runs 2 Notebook and afterwards Refreshes a semantic model. It simulates ingesting data from 2 different sources in Bronze, then performing the load to Silver using a notebook and to Gold with another notebook. Finally it will refresh the related semantic model in PowerBI.
from airflow import DAG
from datetime import datetime
from apache_airflow_microsoft_fabric_plugin.operators.fabric import FabricRunItemOperator
from airflow_powerbi_plugin.operators.powerbi import PowerBIDatasetRefreshOperator
from airflow.hooks.base_hook import BaseHook

workspace_id="<your workspace id>"

with DAG(
    dag_id="Load_DW",
    schedule_interval=None,
    start_date=datetime(2024, 11, 1),
    catchup=False,
    concurrency=20,
) as dag:

    ingest_nav_to_bronze = FabricRunItemOperator(
        task_id="task_ingest_nav_to_bronze",
        fabric_conn_id="fabric",
        workspace_id=workspace_id,
        item_id="<your pipeline id>",
        job_type="Pipeline",
        wait_for_termination=True,
        deferrable=False,
    )

    ingest_bc_to_bronze = FabricRunItemOperator(
        task_id="task_ingest_bc_to_bronze",
        fabric_conn_id="fabric",
        workspace_id=workspace_id,
        item_id="<your pipeline id>",
        job_type="Pipeline",
        wait_for_termination=True,
        deferrable=False,
    )

    load_erp_to_silver = FabricRunItemOperator(
        task_id="task_load_erp_to_silver",
        fabric_conn_id="fabric",
        workspace_id=workspace_id,
        item_id="<your notebook id>",
        job_type="RunNotebook",
        wait_for_termination=True,
        deferrable=False,
    )

    load_gold = FabricRunItemOperator(
        task_id="task_load_gold",
        fabric_conn_id="fabric",
        workspace_id=workspace_id,
        item_id="<your notebook id>",
        job_type="RunNotebook",
        wait_for_termination=True,
        deferrable=False,
    )

    refresh_pbi_sales = PowerBIDatasetRefreshOperator(
       powerbi_conn_id= "powerbi",
       task_id="task_refresh_pbi_sales",
       dataset_id="<your dataset id>",
       group_id=workspace_id,
    )

    ingest_nav_to_bronze>>load_erp_to_silver
    ingest_bc_to_bronze>>load_erp_to_silver>>load_gold>>refresh_pbi_sales
Create plugin to monitor Fabric
In order to get an option to jump to the Fabric item execution details, you can add a plugin file by clicking “+ New” and select the plugin folder. Create a file fabric_hook.py with the below content:
from airflow.plugins_manager import AirflowPlugin
from apache_airflow_microsoft_fabric_plugin.hooks.fabric import FabricHook
from apache_airflow_microsoft_fabric_plugin.operators.fabric import FabricRunItemLink

class AirflowFabricPlugin(AirflowPlugin):
    name = "fabric_plugin"
    operator_extra_links = [FabricRunItemLink()]
    hooks = [FabricHook]
Create plugin to monitor PowerBI
Similar to the above create a plugin file for powerbi named powerbi_hook.py with below content:
from airflow.plugins_manager import AirflowPlugin

from airflow_powerbi_plugin.hooks.powerbi import PowerBIHook
from airflow_powerbi_plugin.operators.powerbi import PowerBILink

# Defining the plugin class
class AirflowExtraLinkPlugin(AirflowPlugin):
    """
    PowerBI plugin.
    """

    name = "powerbi_plugin"
    operator_extra_links = [
        PowerBILink(),
    ]
    hooks= [
        PowerBIHook,
    ]
Airflow DAG execution
Finally all pieces are in place. Now you can run the DAG and if all is configured correctly the graph will be executed step by step as designed.
The execution can be monitorred with the “Monitor in Apache Airflow” button, providing detailed insight in the progress.
You can view the DAG as a graph (or grid) like below.

Also the past execution statuses can be monitorred and comparisons with execution duration can be done. Clicking on a square brings you to the details and logs of the specific node.

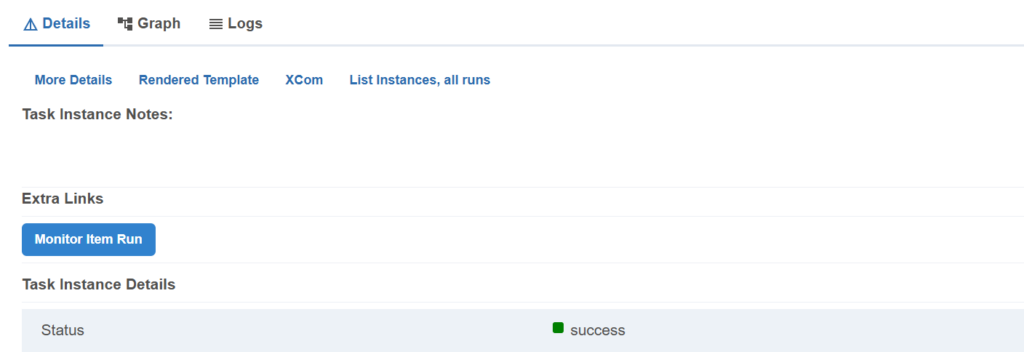
Thanks to the plugin hooks you’ll see a button in Extra links “Monitor Item Run” (or “Monitor PowerBI dataset”), which brings you to the Fabric/PowerBI item with logs.
Conclusion
With the above setup you can monitor the Fabric items and datasets from one single orchestration tool. I hope my article opens up this great technology for you to use data transformations and a full ETL/ELT flow in a professional way in the Fabric environment.
Harmen Wessels
Hi Mattias,
Thanks for the blog, we where stuck on getting the refresh token, but you helped us here!
One point of feedback, the step with refresh token the parameter is not redirect_url but redirect_uri :).
Regards,
Harmen
mattias
Thank you very much Harmen! Well spotted, I thought of doing one thing from memory 🙂 I’ll correct it above.
Łukasz
hi Mattias,
I also had issue with getting tokens using Microsoft docs and your article helped me a lot with setting up everything.
Regards,
Lukasz.
mattias
Great to hear Lukasz! Glad it saved you some headaches
arun sundar s
hello Mattias,
steps to set permissions, get access tokens were very helpful
however this error shows up while running DAG: ModuleNotFoundError: No module named ‘apache_airflow_microsoft_fabric_plugin’
this error shows up while configuring Airflow environment : The requirement ‘apache-airflow-microsoft-fabric-plugin’ is not allowed since it may conflict with the currently installed version, any idea ?
Thank you,
Arun